[row label=”Intro”]
[col span=”4″ span__sm=”12″]
[ux_image id=”64156″]
[/col]
[col span=”8″ span__sm=”12″]
Rebooting Your Alarm Panel
Sometimes your alarm will need to be rebooted or reset which is simply powering down the alarm completely then restarting. This should not be confused with “Defaulting The System” which would erase all existing panel configurations of zones, passcodes, essentially wiping the panel clean to factory settings.
When is a reboot necessary:
- Alarm is unresponsive
- You are adding new hardware which always requires a powerdown to safely move wiring
- Communicator has lost contact with the app service such as AlarmNet, Alarm.com
- When instructed by your alarm dealer troubleshooting a system problem remotely
Keep in mind an alarm is just a small dedicated computer system that at times may need to be rebooted due to a power surge or other external influences. While the need to reset your system is rare (many systems run for a decade or more without a reboot) it can come up.
We list below simple reboot instructions for the major alarm panels on the market today.
[/col]
[/row]
[divider width=”1000px”]
[row label=”Honeywell Vista”]
[col span=”4″ span__sm=”12″ align=”center”]
[ux_image id=”32506″]
[ux_image id=”69131″ width=”58″]
[ux_image id=”34856″ width=”37″]
[/col]
[col span=”8″ span__sm=”12″]
Honeywell Vista 10P, 15P, 20P, 21iP, SafeWatch Pro 3000 Hardwired Panels
For hardwired security systems there will be a metal enclosure located somewhere out of sight such as in the basement, closet, garage, but always in a protected space. Alarm panels are low-voltage devices and use plug-in transformers rather than direct 120VAC wiring. The transformer will be close to this panel enclosure and usually screwed to the outlet cover plate so no one unplugs the transformer accidentally disabling the alarm. The system’s backup battery is inside this enclosure and can easily be disconnected which will be needed to reset the Installer Code. All configuration/programming is stored on nonvolatile memory so there is no danger of losing anything when power is lost. Here are the steps:
-
- Unplug the 16.5VAC transformer from the 120VAC unswitched wall outlet. If you can’t seem to locate this transformer you could also carefully remove the wire from Terminal 1 on a Vista panel. Be careful to not short out the transformer by touching the metal enclosure or any other screw terminal.
- Unplug the backup battery located in the metal enclosure. Just slide either the Red or Black wire off of the clip on the battery. There is no need to disconnect both the Black and Red, just one.
- Ensure the system keypad is dark (no power)
- Wait ten seconds then plug the battery back in.
- Plug the transformer back in or reattached the wire to Terminal 1.
- Check system keypad to see that the system is booting back up. It may take a minute or so to return to its normal display.
[/col]
[/row]
[divider width=”1000px”]
[row label=”Honeywell LynxTouch”]
[col span=”4″ span__sm=”12″ align=”center”]
[ux_image id=”69133″]
[ux_image id=”242208″ width=”48″]
[/col]
[col span=”8″ span__sm=”12″]
Honeywell LynxTouch L5210, L7000
Follow these steps to reset your Honeywell LynxTouch wireless security system. The LynxTouch is an “all-in-one” wireless alarm system meaning the keypad, control panel, wireless transceiver, siren, backup battery are all contained in one housing.
Soft Reboot
- From your keypad press Security, More, Tools, then enter your Master Code. This is generally the code you arm and disarm with.
- Select Test, Reboot, then YES. The system will begin its reboot process which can take a few minutes to complete.
If the Soft Reboot does not help then a Hard Reboot by removing power may be necessary.
Hard Reboot
- Unplug the low voltage transformer from the nearby 120VAC outlet. If unsure where the transformer is located open the front of the LynxTouch and disconnect one of the wires connecting the transformer to the L7000 or L5210 motherboard.
- Unhook the front face of the LynxTouch by depressing the two clips at the top of the keypad. The L7000/L5210 will start beeping when the face plate is unclipped (tamper alarm). Just hit the green HOME button to silence.
- Wait 60 seconds then disconnect the backup battery battery from inside the LynxTouch by unhooking the white plug on battery.
- Wait ten seconds then plug battery back in and reconnect transformer wire to panel or plug the transformer back into the 120VAC wall outlet.
[/col]
[/row]
[divider width=”1000px”]
[row label=”Honeywell Lyric”]
[col span=”4″ span__sm=”12″ align=”center”]
[ux_image id=”69135″]
[ux_image id=”242208″ width=”48″]
[/col]
[col span=”8″ span__sm=”12″]
Honeywell Lyric Controller
Follow these steps to reset your Honeywell Lyric wireless security system. The Lyric is an “all-in-one” wireless alarm system meaning the keypad, control panel, wireless transceiver, siren, backup battery are all contained in one housing.
- Unplug the low voltage transformer from the nearby 120VAC outlet. If unsure where the transformer is located open the front of the Lyric and disconnect one of the wires connecting the transformer to the panel’s motherboard.
- Unhook the front face of the Lyric by loosening the screw at the center bottom of the keypad and sliding the Lyric UP from its wall mounting plate. The Lyric will start beeping when the face plate is opened (tamper alarm). Just hit the HOME button to silence.
- Wait 60 seconds then disconnect the backup battery battery from inside the Lyric by unhooking the white plug on battery.
- Wait ten seconds then plug battery back in and reconnect transformer wire to panel or plug the transformer back into the 120VAC wall outlet.
There is also a Soft Reboot option as well.
- From your keypad press Security, Tools, then enter your Installer Code. 4112 is the default Installer Code unless changed by you or a dealer.
- Select Program. System Programming will display.
- Select Test then Diagnostics
- Select Reboot. Confirm you want to reboot by pressing YES
If the Soft Reboot does not help then a Hard Reboot by removing power may be necessary.
[/col]
[/row]
[divider width=”1000px”]
[row label=”Honeywell ProA7Plus”]
[col span=”4″ span__sm=”12″ align=”center”]
[ux_image id=”102482″]
[ux_image id=”242208″ width=”48″]
[/col]
[col span=”8″ span__sm=”12″]
Honeywell ProA7, ProA7Plus
Follow these steps to reset your Honeywell ProA7Plus wireless security system. This popular panel is an “all-in-one” wireless alarm system meaning the keypad, control panel, wireless transceiver, siren, backup battery are all contained in one housing.
- Unplug the low voltage transformer from the nearby 120VAC outlet. If unsure where the transformer is located open the front of the ProA7Plus and disconnect one of the wires connecting the transformer to the panel’s motherboard.
- Unhook the front face of the ProA7Plus by loosening the set screw at the center bottom of the keypad and sliding the panel UP from its wall mounting plate. The panel will start beeping when the face plate is opened (tamper alarm). Just hit the HOME button to silence.
- Wait 60 seconds then disconnect the backup battery battery from inside the ProA7Plus by unhooking the plug on the battery from the panel’s motherboard.
- Wait ten seconds then plug battery back in and reconnect transformer wire to panel or plug the transformer back into the 120VAC wall outlet.
There is also a Soft Reboot option as well.
- Select Menu (three horizontal lines) at the bottom center of screen
- Press Tools, then enter Master Code
- Press Reboot System to power cycle the ProA7Plus.
If the Soft Reboot does not help then a Hard Reboot by removing power may be necessary.
[/col]
[/row]
[divider width=”1000px”]
[row label=”DSC PowerSeries”]
[col span=”4″ span__sm=”12″ align=”center”]
[ux_image id=”72411″]
[ux_image id=”69131″ width=”58″]
[ux_image id=”34856″ width=”37″]
[/col]
[col span=”8″ span__sm=”12″]
DSC PowerSeries PC1616, PC1832, PC1864, HS2016, HS2032, HS2064
For hardwired DSC security systems there will be a metal enclosure located somewhere out of sight such as in the basement, closet, garage, but always in a protected space. Alarm panels are low-voltage devices and use plug-in transformers rather than direct 120VAC wiring. The transformer will be close to this panel enclosure and usually screwed to the outlet cover plate so no one unplugs the transformer accidentally disabling the alarm. The system’s backup battery is inside this enclosure and can easily be disconnected which will be needed to reset the Installer Code. All configuration/programming is stored on nonvolatile memory so there is no danger of losing anything when power is lost. Here are the steps:
-
- Unplug the 16.5VAC transformer from the 120VAC unswitched wall outlet. If you can’t seem to locate this transformer you could also carefully remove the wire from AC (either one). Be careful to not short out the transformer by touching the metal enclosure or any other screw terminal.
- Unplug the backup battery located in the metal enclosure. Just slide either the Red or Black wire off of the clip on the battery. There is no need to disconnect both the Black and Red, just one.
- Ensure the system keypad is dark (no power)
- Wait ten seconds then plug the battery back in.
- Plug the transformer back in or reattached the wire to AC.
- Check system keypad to see that the system is booting back up. It may take a minute or so to return to its normal display.
[/col]
[/row]
[divider width=”1000px”]
[row label=”Interlogix NetworX”]
[col span=”4″ span__sm=”12″ align=”center”]
[ux_image id=”76281″]
[ux_image id=”34856″ width=”37″]
[/col]
[col span=”8″ span__sm=”12″]
Interlogix/GE NetworX NX-4V2, NX-6V2, NX-8V2, NX-8E
For hardwired Interlogix (GE) security systems there will be a metal enclosure located somewhere out of sight such as in the basement, closet, garage, but always in a protected space. Alarm panels are low-voltage devices and use plug-in transformers rather than direct 120VAC wiring. The transformer will be close to this panel enclosure and usually screwed to the outlet cover plate so no one unplugs the transformer accidentally disabling the alarm. The system’s backup battery is inside this enclosure and can easily be disconnected which will be needed to reset the Installer Code. All configuration/programming is stored on nonvolatile memory so there is no danger of losing anything when power is lost. Here are the steps:
-
- Unplug the 16.5VAC transformer from the 120VAC unswitched wall outlet. If you can’t seem to locate this transformer you could also carefully remove the wire from AC (either one). Be careful to not short out the transformer by touching the metal enclosure or any other screw terminal.
- Unplug the backup battery located in the metal enclosure. Just slide either the Red or Black wire off of the clip on the battery. There is no need to disconnect both the Black and Red, just one.
- Ensure the system keypad is dark (no power)
- Wait ten seconds then plug the battery back in.
- Plug the transformer back in or reattached the wire to AC.
- Check system keypad to see that the system is booting back up. It may take a minute or so to return to its normal display.
[/col]
[/row]
[divider width=”1000px”]
[row label=”Interlogix SimonXT”]
[col span=”4″ span__sm=”12″ align=”center”]
[ux_image id=”96879″]
[ux_image id=”34856″ width=”37″]
[/col]
[col span=”8″ span__sm=”12″]
Interlogix/GE SimonXT
Follow these steps to reset your Interlogix SimonXT wireless security system. The SimonXT is an “all-in-one” wireless alarm system meaning the keypad, control panel, wireless transceiver, siren, backup battery are all contained in one housing.
- Unplug the low voltage transformer from the nearby 120VAC outlet. If unsure where the transformer is located open the front of the SimonXT and disconnect one of the wires connecting the transformer to the panel’s motherboard.
- Unhook the front face of the SimonXT by lifting the two tabs at the top of the keypad. The panel will start beeping when the face plate is unclipped (tamper alarm). Just hit any key to silence.
- Wait 60 seconds then disconnect the backup battery battery from inside the SimonXT by unhooking the plug on battery from the motherboard.
- Wait ten seconds then plug battery back in and reconnect transformer wire to panel or plug the transformer back into the 120VAC wall outlet.
[/col]
[/row]
[row label=”Interlogix SimonXT”]
[col span=”4″ span__sm=”12″ align=”center”]
[ux_image id=”73226″ width=”74″]
[ux_image id=”34856″ width=”37″]
[/col]
[col span=”8″ span__sm=”12″]
Interlogix/GE SimonXTi
Follow these steps to reset your Interlogix SimonXT wireless security system. The SimonXTi is an “all-in-one” wireless alarm system meaning the keypad, control panel, wireless transceiver, siren, backup battery are all contained in one housing.
- Unplug the low voltage transformer from the nearby 120VAC outlet. If unsure where the transformer is located open the front of the SimonXT and disconnect one of the wires connecting the transformer to the panel’s motherboard.
- Unhook the front face of the SimonXTi by first removing the trim ring by lifting at the notch on the lower right side of the keypad.
- Next lift the two tabs at the top of the keypad. The panel will start beeping when the face plate is unclipped (tamper alarm). Just hit any key to silence.
- Wait 60 seconds then disconnect the backup battery battery from inside the SimonXT by unhooking the plug on battery from the motherboard.
- Wait ten seconds then plug battery back in and reconnect transformer wire to panel or plug the transformer back into the 120VAC wall outlet.
[/col]
[/row]
[divider width=”1000px”]
[row label=”Interlogix Concord 4″]
[col span=”4″ span__sm=”12″ align=”center”]
[ux_image id=”158342″]
[ux_image id=”34856″ width=”37″]
[/col]
[col span=”8″ span__sm=”12″]
Interlogix/GE Concord 4
For hardwired security systems there will be a metal enclosure located somewhere out of sight such as in the basement, closet, garage, but always in a protected space. Alarm panels are low-voltage devices and use plug-in transformers rather than direct 120VAC wiring. The transformer will be close to this panel enclosure and usually screwed to the outlet cover plate so no one unplugs the transformer accidentally disabling the alarm. The system’s backup battery is inside this enclosure and can easily be disconnected which will be needed to reset the Installer Code. All configuration/programming is stored on nonvolatile memory so there is no danger of losing anything when power is lost. Here are the steps:
-
- Unplug the 16.5VAC transformer from the 120VAC unswitched wall outlet. If you can’t seem to locate this transformer you could also carefully remove the wire from Terminal 1 on the Concord 4 panel. Be careful to not short out the transformer by touching the metal enclosure or any other screw terminal.
- Unplug the backup battery located in the metal enclosure. Just slide either the Red or Black wire off of the clip on the battery. There is no need to disconnect both the Black and Red, just one.
- Ensure the system keypad is dark (no power)
- Wait ten seconds then plug the battery back in.
- Plug the transformer back in or reattached the wire to Terminal 1.
- Check system keypad to see that the system is booting back up. It may take a minute or so to return to its normal display.
[/col]
[/row]
[divider width=”1000px”]
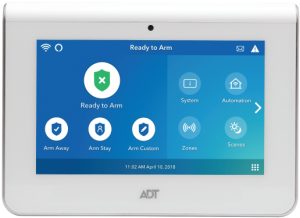
[row label=”Qolsys”]
[col span=”4″ span__sm=”12″ align=”center”]
[ux_image id=”96660″]
[ux_image id=”242208″ width=”48″]
[/col]
[col span=”8″ span__sm=”12″]
Qolsys IQ 2, 2+, 4, IQ Hub
Follow these steps to reset your Qolsys wireless security system. This popular panel is an “all-in-one” wireless alarm system meaning the keypad, control panel, wireless transceiver, siren, backup battery are all contained in one housing.
- Unplug the low voltage transformer from the nearby 120VAC outlet. If unsure where the transformer is located open the front of the IQ Panel and disconnect one of the wires connecting the transformer to the panel’s motherboard.
- Unhook the front face of the IQ Panel by loosening the set screw at the center bottom of the keypad and pulling the panel AWAY from its wall mounting plate. The panel will start beeping when the face plate is opened (tamper alarm). Just hit the HOME button to silence.
- Wait 60 seconds then disconnect the backup battery battery from inside the IQ Panel by unhooking the plug on the battery from the panel’s motherboard.
- Wait ten seconds then plug battery back in and reconnect transformer wire to panel or plug the transformer back into the 120VAC wall outlet.
There is also a Soft Reboot option as well.
- Press the small gray bar above the Time on the Home screen
- Press Settings then Advanced Settings.
- Enter your Master Code (the code you arm and disarm with)
- Press Panel Reboot and select YES to reboot the IQ Panel
If the Soft Reboot does not help then a Hard Reboot by removing power may be necessary.
[/col]
[/row]
[divider width=”1000px”]
[row label=”2GIG GC2″]
[col span=”4″ span__sm=”12″]
[ux_image id=”36751″]
[ux_image id=”89403″]
[/col]
[col span=”8″ span__sm=”12″]
2GIG GC2, GC2e, GC3, GC3e
Follow these steps to reset your 2GIG wireless security system. This popular panel is an “all-in-one” wireless alarm system meaning the keypad, control panel, wireless transceiver, siren, backup battery are all contained in one housing.
- Unplug the low voltage transformer from the nearby 120VAC outlet. If unsure where the transformer is located open the front of the 2GIG panel and carefully disconnect one of the wires connecting the transformer to the panel’s motherboard. Look for Terminal 1, 14VDC Power Input +.
- Unhook the front face of the 2GIG Panel by loosening the set screw at the center top of the keypad and pulling the panel AWAY from its wall mounting plate. The panel will start beeping when the face plate is opened (tamper alarm). Just hit the HOME button to silence.
- Wait 60 seconds then disconnect the backup battery battery from inside the 2GIG Panel by unhooking the plug on the battery from the panel’s motherboard.
- Wait ten seconds then plug battery back in and reconnect transformer wire to panel or plug the transformer back into the 120VAC wall outlet.
[/col]
[/row]
[divider width=”1000px”]
[row label=”2GIG Edge”]
[col span=”4″ span__sm=”12″ align=”center”]
[ux_image id=”102018″]
[ux_image id=”242208″ width=”48″]
[/col]
[col span=”8″ span__sm=”12″]
2GIG Edge
Follow these steps to reset your 2GIG Edge wireless security system. This popular panel is an “all-in-one” wireless alarm system meaning the keypad, control panel, wireless transceiver, siren, backup battery are all contained in one housing.
- Unplug the low voltage transformer from the nearby 120VAC outlet. If unsure where the transformer is located open the front of the 2GIG panel and carefully disconnect one of the wires connecting the transformer to the panel’s motherboard. Look for Terminal 9, DC IN +.
- Unhook the front face of the 2GIG Panel by loosening the set screw at the center bottom of the keypad and pulling the panel AWAY from its wall mounting plate. The panel will start beeping when the face plate is opened (tamper alarm). Just hit the HOME button to silence.
- Wait 60 seconds then disconnect the backup battery battery from inside the 2GIG Panel by unhooking the plug on the battery from the panel’s motherboard.
- Wait ten seconds then plug battery back in and reconnect transformer wire to panel or plug the transformer back into the 120VAC wall outlet.
There is also a Soft Reboot option as well.
- Tap the 2GIG Logo on the Home Screen followed by your Master Code (the code you arm and disarm with) when prompted
- Press System Info
- Press REBOOT followed by Master Code
If the Soft Reboot does not help then a Hard Reboot by removing power may be necessary.
[/col]
[/row]


 .
.
 .
.  .
. to adjust the distance.


 Your home is your castle as they say. It’s where you go to escape and find peace in a world full of madness. For this reason, it’s imperative that you create an environment that is safe for the sake of you and your family. A
  The first signal sent by your control panel will alert monitoring personnel at the central station, who will call to notify you and confirm whether it’s a real emergency, or a false alarm. If you don’t respond, the monitoring service contacts the proper local agency to dispatch emergency personnel to your address. Some security systems offer additional features, such as immediate alarms which don’t depend upon a confirmation call (keypad fire alarm for example) or silent alarms that don’t alert intruders and give them a chance to disable the system before the follow-up signal is sent.
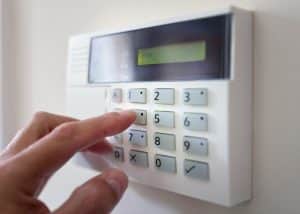
 Voice over IP (VoIP) and broadband Internet communication are options, but they are not considered reliable paths by themselves like land lines. They can also be cut by a burglar and more importantly they highly vulnerable to power outage. Most people do not have backup power for their home networking equipment such as a modem and/or router. If power goes out so may your Internet connection. Has this already happened to you during a storm?
 Underwriters Laboratories (UL) is a leader in certifying and inspecting central station standards and performance capabilities. UL has rigid standards and only a select percentage of monitoring facilities qualify for their listing. Annual inspections of listed central stations by UL are made to ensure continued compliance.
 Unmonitored “local” alarms can still provide benefit, though limited. There is no monthly expense to deal with especially for multiple years with the big guys. If you’re home, the alarm noise lets you know there’s a problem and allows you to take necessary action. The noise may even frighten off some less-determined intruders. Many emergencies however are too serious to deal with by yourself, especially if you’re disabled or otherwise incapacitated. In most cases you’ll want police, fire, or medical professionals on the scene as soon as possible.
 We all have smartphones. Why not use them to control your home security and automation devices too? This is at the top of the wish list for most DIY homeowners.
 By this point, you understand the basics of home security alarm monitoring. But there are some other key things you should keep in mind when choosing monitoring options. Some things you may have already discovered through previous research. But others you may be surprised to learn about with regards to alarm monitoring.


 Phone lines are always at risk of being cut by an intruder before they attempt to break-in to your home. Phone lines also have the added risk of being disabled by weather events such as a down tree taking down the line to your home during a storm or snow blizzard.


 However with an all-in-one system the control panel is more visible to an intruder since it’s generally mounted to a wall in a central location of the home making it easy for family members to interact the system. This makes most all-in-systems extremely vulnerable to an intruder disabling the system before a siren even activates, and certainly before any alarm signal can be transmitted. Advanced Protection Logic (APL) however eliminates this risk because a pre-alarm signal is sent as soon as the entry delay (door opening) begins. A second signal, pre-alarm cancel, is sent when the security system is disarmed which indicates to the central station everything is OK – if received within say 60 seconds of the initial pre-alarm signal. If the panel is “smashed” before it can send the second pre-alarm cancel signal, then the central station will assume there is a valid burglary in process and take appropriate response.

 At
At 


