Your cart is currently empty!
Tag: alarm system
-
How to Reboot (Reset) My Alarm System Panel
[row label=”Intro”] [col span=”4″ span__sm=”12″] [ux_image id=”64156″] [/col] [col span=”8″ span__sm=”12″]
Rebooting Your Alarm Panel
Sometimes your alarm will need to be rebooted or reset which is simply powering down the alarm completely then restarting. This should not be confused with “Defaulting The System” which would erase all existing panel configurations of zones, passcodes, essentially wiping the panel clean to factory settings.
When is a reboot necessary:
- Alarm is unresponsive
- You are adding new hardware which always requires a powerdown to safely move wiring
- Communicator has lost contact with the app service such as AlarmNet, Alarm.com
- When instructed by your alarm dealer troubleshooting a system problem remotely
Keep in mind an alarm is just a small dedicated computer system that at times may need to be rebooted due to a power surge or other external influences. While the need to reset your system is rare (many systems run for a decade or more without a reboot) it can come up.
We list below simple reboot instructions for the major alarm panels on the market today.
[/col] [/row] [divider width=”1000px”] [row label=”Honeywell Vista”] [col span=”4″ span__sm=”12″ align=”center”] [ux_image id=”32506″] [ux_image id=”69131″ width=”58″] [ux_image id=”34856″ width=”37″] [/col] [col span=”8″ span__sm=”12″]Honeywell Vista 10P, 15P, 20P, 21iP, SafeWatch Pro 3000 Hardwired Panels
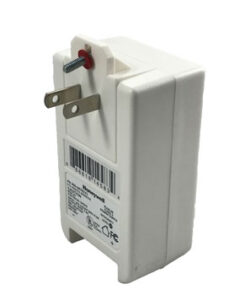
For hardwired security systems there will be a metal enclosure located somewhere out of sight such as in the basement, closet, garage, but always in a protected space. Alarm panels are low-voltage devices and use plug-in transformers rather than direct 120VAC wiring. The transformer will be close to this panel enclosure and usually screwed to the outlet cover plate so no one unplugs the transformer accidentally disabling the alarm. The system’s backup battery is inside this enclosure and can easily be disconnected which will be needed to reset the Installer Code. All configuration/programming is stored on nonvolatile memory so there is no danger of losing anything when power is lost. Here are the steps:
-
- Unplug the 16.5VAC transformer from the 120VAC unswitched wall outlet. If you can’t seem to locate this transformer you could also carefully remove the wire from Terminal 1 on a Vista panel. Be careful to not short out the transformer by touching the metal enclosure or any other screw terminal.
- Unplug the backup battery located in the metal enclosure. Just slide either the Red or Black wire off of the clip on the battery. There is no need to disconnect both the Black and Red, just one.
- Ensure the system keypad is dark (no power)
- Wait ten seconds then plug the battery back in.
- Plug the transformer back in or reattached the wire to Terminal 1.
- Check system keypad to see that the system is booting back up. It may take a minute or so to return to its normal display.
[/col] [/row] [divider width=”1000px”] [row label=”Honeywell LynxTouch”] [col span=”4″ span__sm=”12″ align=”center”] [ux_image id=”69133″] [ux_image id=”242208″ width=”48″] [/col] [col span=”8″ span__sm=”12″]
Honeywell LynxTouch L5210, L7000
Follow these steps to reset your Honeywell LynxTouch wireless security system. The LynxTouch is an “all-in-one” wireless alarm system meaning the keypad, control panel, wireless transceiver, siren, backup battery are all contained in one housing.
Soft Reboot
- From your keypad press Security, More, Tools, then enter your Master Code. This is generally the code you arm and disarm with.
- Select Test, Reboot, then YES. The system will begin its reboot process which can take a few minutes to complete.
If the Soft Reboot does not help then a Hard Reboot by removing power may be necessary.
Hard Reboot
- Unplug the low voltage transformer from the nearby 120VAC outlet. If unsure where the transformer is located open the front of the LynxTouch and disconnect one of the wires connecting the transformer to the L7000 or L5210 motherboard.
- Unhook the front face of the LynxTouch by depressing the two clips at the top of the keypad. The L7000/L5210 will start beeping when the face plate is unclipped (tamper alarm). Just hit the green HOME button to silence.
- Wait 60 seconds then disconnect the backup battery battery from inside the LynxTouch by unhooking the white plug on battery.
- Wait ten seconds then plug battery back in and reconnect transformer wire to panel or plug the transformer back into the 120VAC wall outlet.
Honeywell Lyric Controller
Follow these steps to reset your Honeywell Lyric wireless security system. The Lyric is an “all-in-one” wireless alarm system meaning the keypad, control panel, wireless transceiver, siren, backup battery are all contained in one housing.
- Unplug the low voltage transformer from the nearby 120VAC outlet. If unsure where the transformer is located open the front of the Lyric and disconnect one of the wires connecting the transformer to the panel’s motherboard.
- Unhook the front face of the Lyric by loosening the screw at the center bottom of the keypad and sliding the Lyric UP from its wall mounting plate. The Lyric will start beeping when the face plate is opened (tamper alarm). Just hit the HOME button to silence.
- Wait 60 seconds then disconnect the backup battery battery from inside the Lyric by unhooking the white plug on battery.
- Wait ten seconds then plug battery back in and reconnect transformer wire to panel or plug the transformer back into the 120VAC wall outlet.
There is also a Soft Reboot option as well.
- From your keypad press Security, Tools, then enter your Installer Code. 4112 is the default Installer Code unless changed by you or a dealer.
- Select Program. System Programming will display.
- Select Test then Diagnostics
- Select Reboot. Confirm you want to reboot by pressing YES
If the Soft Reboot does not help then a Hard Reboot by removing power may be necessary.
[/col] [/row] [divider width=”1000px”] [row label=”Honeywell ProA7Plus”] [col span=”4″ span__sm=”12″ align=”center”] [ux_image id=”102482″] [ux_image id=”242208″ width=”48″] [/col] [col span=”8″ span__sm=”12″]
Honeywell ProA7, ProA7Plus
Follow these steps to reset your Honeywell ProA7Plus wireless security system. This popular panel is an “all-in-one” wireless alarm system meaning the keypad, control panel, wireless transceiver, siren, backup battery are all contained in one housing.
- Unplug the low voltage transformer from the nearby 120VAC outlet. If unsure where the transformer is located open the front of the ProA7Plus and disconnect one of the wires connecting the transformer to the panel’s motherboard.
- Unhook the front face of the ProA7Plus by loosening the set screw at the center bottom of the keypad and sliding the panel UP from its wall mounting plate. The panel will start beeping when the face plate is opened (tamper alarm). Just hit the HOME button to silence.
- Wait 60 seconds then disconnect the backup battery battery from inside the ProA7Plus by unhooking the plug on the battery from the panel’s motherboard.
- Wait ten seconds then plug battery back in and reconnect transformer wire to panel or plug the transformer back into the 120VAC wall outlet.
There is also a Soft Reboot option as well.
- Select Menu (three horizontal lines) at the bottom center of screen
- Press Tools, then enter Master Code
- Press Reboot System to power cycle the ProA7Plus.
If the Soft Reboot does not help then a Hard Reboot by removing power may be necessary.
DSC PowerSeries PC1616, PC1832, PC1864, HS2016, HS2032, HS2064
For hardwired DSC security systems there will be a metal enclosure located somewhere out of sight such as in the basement, closet, garage, but always in a protected space. Alarm panels are low-voltage devices and use plug-in transformers rather than direct 120VAC wiring. The transformer will be close to this panel enclosure and usually screwed to the outlet cover plate so no one unplugs the transformer accidentally disabling the alarm. The system’s backup battery is inside this enclosure and can easily be disconnected which will be needed to reset the Installer Code. All configuration/programming is stored on nonvolatile memory so there is no danger of losing anything when power is lost. Here are the steps:
-
- Unplug the 16.5VAC transformer from the 120VAC unswitched wall outlet. If you can’t seem to locate this transformer you could also carefully remove the wire from AC (either one). Be careful to not short out the transformer by touching the metal enclosure or any other screw terminal.
- Unplug the backup battery located in the metal enclosure. Just slide either the Red or Black wire off of the clip on the battery. There is no need to disconnect both the Black and Red, just one.
- Ensure the system keypad is dark (no power)
- Wait ten seconds then plug the battery back in.
- Plug the transformer back in or reattached the wire to AC.
- Check system keypad to see that the system is booting back up. It may take a minute or so to return to its normal display.
Interlogix/GE NetworX NX-4V2, NX-6V2, NX-8V2, NX-8E
For hardwired Interlogix (GE) security systems there will be a metal enclosure located somewhere out of sight such as in the basement, closet, garage, but always in a protected space. Alarm panels are low-voltage devices and use plug-in transformers rather than direct 120VAC wiring. The transformer will be close to this panel enclosure and usually screwed to the outlet cover plate so no one unplugs the transformer accidentally disabling the alarm. The system’s backup battery is inside this enclosure and can easily be disconnected which will be needed to reset the Installer Code. All configuration/programming is stored on nonvolatile memory so there is no danger of losing anything when power is lost. Here are the steps:
-
- Unplug the 16.5VAC transformer from the 120VAC unswitched wall outlet. If you can’t seem to locate this transformer you could also carefully remove the wire from AC (either one). Be careful to not short out the transformer by touching the metal enclosure or any other screw terminal.
- Unplug the backup battery located in the metal enclosure. Just slide either the Red or Black wire off of the clip on the battery. There is no need to disconnect both the Black and Red, just one.
- Ensure the system keypad is dark (no power)
- Wait ten seconds then plug the battery back in.
- Plug the transformer back in or reattached the wire to AC.
- Check system keypad to see that the system is booting back up. It may take a minute or so to return to its normal display.
Interlogix/GE SimonXT
Follow these steps to reset your Interlogix SimonXT wireless security system. The SimonXT is an “all-in-one” wireless alarm system meaning the keypad, control panel, wireless transceiver, siren, backup battery are all contained in one housing.
- Unplug the low voltage transformer from the nearby 120VAC outlet. If unsure where the transformer is located open the front of the SimonXT and disconnect one of the wires connecting the transformer to the panel’s motherboard.
- Unhook the front face of the SimonXT by lifting the two tabs at the top of the keypad. The panel will start beeping when the face plate is unclipped (tamper alarm). Just hit any key to silence.
- Wait 60 seconds then disconnect the backup battery battery from inside the SimonXT by unhooking the plug on battery from the motherboard.
- Wait ten seconds then plug battery back in and reconnect transformer wire to panel or plug the transformer back into the 120VAC wall outlet.
Interlogix/GE SimonXTi
Follow these steps to reset your Interlogix SimonXT wireless security system. The SimonXTi is an “all-in-one” wireless alarm system meaning the keypad, control panel, wireless transceiver, siren, backup battery are all contained in one housing.
- Unplug the low voltage transformer from the nearby 120VAC outlet. If unsure where the transformer is located open the front of the SimonXT and disconnect one of the wires connecting the transformer to the panel’s motherboard.
- Unhook the front face of the SimonXTi by first removing the trim ring by lifting at the notch on the lower right side of the keypad.
- Next lift the two tabs at the top of the keypad. The panel will start beeping when the face plate is unclipped (tamper alarm). Just hit any key to silence.
- Wait 60 seconds then disconnect the backup battery battery from inside the SimonXT by unhooking the plug on battery from the motherboard.
- Wait ten seconds then plug battery back in and reconnect transformer wire to panel or plug the transformer back into the 120VAC wall outlet.
Interlogix/GE Concord 4
For hardwired security systems there will be a metal enclosure located somewhere out of sight such as in the basement, closet, garage, but always in a protected space. Alarm panels are low-voltage devices and use plug-in transformers rather than direct 120VAC wiring. The transformer will be close to this panel enclosure and usually screwed to the outlet cover plate so no one unplugs the transformer accidentally disabling the alarm. The system’s backup battery is inside this enclosure and can easily be disconnected which will be needed to reset the Installer Code. All configuration/programming is stored on nonvolatile memory so there is no danger of losing anything when power is lost. Here are the steps:
-
- Unplug the 16.5VAC transformer from the 120VAC unswitched wall outlet. If you can’t seem to locate this transformer you could also carefully remove the wire from Terminal 1 on the Concord 4 panel. Be careful to not short out the transformer by touching the metal enclosure or any other screw terminal.
- Unplug the backup battery located in the metal enclosure. Just slide either the Red or Black wire off of the clip on the battery. There is no need to disconnect both the Black and Red, just one.
- Ensure the system keypad is dark (no power)
- Wait ten seconds then plug the battery back in.
- Plug the transformer back in or reattached the wire to Terminal 1.
- Check system keypad to see that the system is booting back up. It may take a minute or so to return to its normal display.
Qolsys IQ 2, 2+, 4, IQ Hub
Follow these steps to reset your Qolsys wireless security system. This popular panel is an “all-in-one” wireless alarm system meaning the keypad, control panel, wireless transceiver, siren, backup battery are all contained in one housing.
- Unplug the low voltage transformer from the nearby 120VAC outlet. If unsure where the transformer is located open the front of the IQ Panel and disconnect one of the wires connecting the transformer to the panel’s motherboard.
- Unhook the front face of the IQ Panel by loosening the set screw at the center bottom of the keypad and pulling the panel AWAY from its wall mounting plate. The panel will start beeping when the face plate is opened (tamper alarm). Just hit the HOME button to silence.
- Wait 60 seconds then disconnect the backup battery battery from inside the IQ Panel by unhooking the plug on the battery from the panel’s motherboard.
- Wait ten seconds then plug battery back in and reconnect transformer wire to panel or plug the transformer back into the 120VAC wall outlet.
There is also a Soft Reboot option as well.
- Press the small gray bar above the Time on the Home screen
- Press Settings then Advanced Settings.
- Enter your Master Code (the code you arm and disarm with)
- Press Panel Reboot and select YES to reboot the IQ Panel
If the Soft Reboot does not help then a Hard Reboot by removing power may be necessary.
[/col] [/row] [divider width=”1000px”] [row label=”2GIG GC2″] [col span=”4″ span__sm=”12″] [ux_image id=”36751″] [ux_image id=”89403″] [/col] [col span=”8″ span__sm=”12″]2GIG GC2, GC2e, GC3, GC3e
Follow these steps to reset your 2GIG wireless security system. This popular panel is an “all-in-one” wireless alarm system meaning the keypad, control panel, wireless transceiver, siren, backup battery are all contained in one housing.
- Unplug the low voltage transformer from the nearby 120VAC outlet. If unsure where the transformer is located open the front of the 2GIG panel and carefully disconnect one of the wires connecting the transformer to the panel’s motherboard. Look for Terminal 1, 14VDC Power Input +.
- Unhook the front face of the 2GIG Panel by loosening the set screw at the center top of the keypad and pulling the panel AWAY from its wall mounting plate. The panel will start beeping when the face plate is opened (tamper alarm). Just hit the HOME button to silence.
- Wait 60 seconds then disconnect the backup battery battery from inside the 2GIG Panel by unhooking the plug on the battery from the panel’s motherboard.
- Wait ten seconds then plug battery back in and reconnect transformer wire to panel or plug the transformer back into the 120VAC wall outlet.
2GIG Edge
Follow these steps to reset your 2GIG Edge wireless security system. This popular panel is an “all-in-one” wireless alarm system meaning the keypad, control panel, wireless transceiver, siren, backup battery are all contained in one housing.
- Unplug the low voltage transformer from the nearby 120VAC outlet. If unsure where the transformer is located open the front of the 2GIG panel and carefully disconnect one of the wires connecting the transformer to the panel’s motherboard. Look for Terminal 9, DC IN +.
- Unhook the front face of the 2GIG Panel by loosening the set screw at the center bottom of the keypad and pulling the panel AWAY from its wall mounting plate. The panel will start beeping when the face plate is opened (tamper alarm). Just hit the HOME button to silence.
- Wait 60 seconds then disconnect the backup battery battery from inside the 2GIG Panel by unhooking the plug on the battery from the panel’s motherboard.
- Wait ten seconds then plug battery back in and reconnect transformer wire to panel or plug the transformer back into the 120VAC wall outlet.
There is also a Soft Reboot option as well.
- Tap the 2GIG Logo on the Home Screen followed by your Master Code (the code you arm and disarm with) when prompted
- Press System Info
- Press REBOOT followed by Master Code
If the Soft Reboot does not help then a Hard Reboot by removing power may be necessary.
[/col] [/row] -
Understanding DIY Home Security Systems – Part 1
Thinking about installing your own Home Security System with maybe Home Automation as well?
With all of the new products released recently the “professional-grade” security market for DIY is finally becoming a reality. Historically this has been a “dealer-only” industry. The difficultly purchasing hardware and getting manufacturer technical support, especially for warranty issues, has been a roadblock for DIY projects. But there ARE paths to tackle those concerns reliably. The real issue however is not where to get the equipment but what equipment do I need and why? Understanding DIY home security system basics is the first step. If you are a home security installation newbie then this series of articles are for you!
Home security (alarm) systems are slowly moving to easier programming, 100% wireless devices, and of course smartphone control, from anywhere. Add Z-Wave control and now you can control not only your security system but lights, thermostats, and door locks. Add IP Video and you have a compelling reason to install a system or upgrade your existing traditional alarm system.
Of course installing everything yourself will save you a bundle and provide confidence your family is firmly protected. With the average security system in use for 15 or more years (or until you move) the cost of monthly central station monitoring can add up as well, especially when using a local security dealer. But where to start?
There are six primary questions in the DIY home security system design process that must be answered before jumping ahead and ordering any equipment. Let’s take a quick “Self-Exam”:
-
What are you trying to protect?
Are you protecting people, property or both? Keep in mind homeowner’s insurance will replace most of your belongings with the obvious exception of family heirlooms or other personal keepsakes. We recommend using a home security systems to protect your family (people) versus property. As mentioned, insurance will cover, for the most part, all personal property.
- How much time and money is budgeted for this project?
Will this be a wired system, wireless or combination of both (hybrid)? Wired systems are by far the least expensive equipment-wise but significantly more labor intensive. Wireless on the other hand is fairly quick to install but the equipment cost can be higher. Since “time is money” make sure you weigh both options carefully. Regardless of which direction you go, doing it yourself will save you hundreds of dollars upfront and annually if you choose an online UL central station monitoring partner.
-
When will you be arming (activating) the alarm system?
Will you or your family be setting the alarm just when you go to bed, when everyone leaves for work/school, or at anytime of the day or night while the home is still occupied? This answer is important since it drives how many and what type of detection sensors are necessary. Focus on protecting people. At night you need to know if a stranger is roaming your home and bedrooms while you sleep. In the daytime what happens if your wife or child comes home unexpectedly and “surprises” someone who is already in the home?
-
Do you have pets in the home and what type?
Cats, dogs, birds? Where do they sleep at night and do they have free roam of the house, night and day? This will determine what type of interior security sensors you will use. Standard PIR motion detectors can only be used in areas that will not contain cats or dogs. However Honeywell and others offer special motion sensors that are “pet immune” up to 80 lbs. As an alternative to motion detectors interior “Acoustic” Glassbreak sensors are also available, and many times used in conjunction with motion detectors.
SPECIAL NOTE!
Manufacturers have had pet immune motion detectors on the market for years and have made progress making them more reliable. We however have never felt completely comfortable recommending them to our company installed customers, especially Central Station monitored customers. Pet immune motion detectors are good at ignoring mid-sized and smaller pets but are not fool-proof. Even one false alarms a year is not acceptable. A standard motion sensor turned upside down or lens masked works better and provides less headaches down the road (more install tricks later). You never want to lose faith in your security system!
-
Who will be using (arming and disarming) the system normally?
Yourself, wife, kids, housekeeper, a babysitter? All security panels offer multiple “passcodes” allowing every family member to have their own unique arm/disarm code. While most customers use just a single primary passcode, we do however recommend programming a babysitter code. This special passcode can arm the system, but the system can only be disarmed with this code when the babysitter code was used to arm. Your normal passcode(s) can always disarm the system however regardless of what passcode was used to activate the security system. For example, you have a babysitter watch your kids while you’re out on the town with your wife. The babysitter can arm and disarm the system while you’re gone, but once you arm the system with “your” passcode, the babysitter code can no longer be used to disarm the system.
You may want to consider using wireless keyfobs for added convenience and simplicity. No passcodes to key in and no need to give an outsider a passcode.
-
Will this be a “local” alarm or central station monitored alarm?
A local alarm means you will have an outside (hopefully) siren and will be depending upon your neighbors to call the police. How many times have you heard an alarm siren in your neighborhood (home or car alarm)? Did you call the police? An outside siren is still a good deterrent since anyone inside now knows an intruder is around, and neighbors may at least look out their window to see what’s going on.
Unfortunately your back door for example could remain “open” all day if the intruder took off running which is just an invitation to another thief. A Central Station Monitored alarm system will notify your local police and/or fire department of alarms in addition to calling your cell phone, pager, etc. to let you know something important is happening at home.
As far as fire protection is concerned (smoke detectors and/or heat sensors, CO detectors) central station monitoring is a must! Don’t forget the safety of pets while the family is out and the home is filling with lethal smoke or gas. Also consider whether you we be using a standard telephone line (POTS), broadband Internet or cellular (GSM/CDMA) connectivity to contact the central station.
Cellular provides increased security since the line cannot be “cut” by an intruder before entering. The most popular communication method today is broadband Internet with cellular backup. IP communication with the central station over the Internet is lower cost. But what happens when you have a power failure? Is your broadband Internet router and switches on battery backup? Generally the cellular unit (communicator) is connected directly to your alarm panel which has its own battery backup in the event of a power failure. Having both Internet and cellular paths to the central station is best and typical with a professionally installed system.
Next up: What equipment is out there and how do they work to protect your home and family? Read Understanding Home Security – Alarm System Configurations.
[ux_banner height=”200px”]
[text_box width=”72″ position_x=”50″ position_y=”50″]
Was this POST helpful?
Did you know we offer alarm monitoring from just $8.95 a month – no contract?
[button text=”Learn More” color=”secondary” radius=”15″ link=”https://diyalarms.net/no-contract-security-system-monitoring-from-8-95/” target=”_blank”]
[/text_box]
[/ux_banner]
-